
What is Feishu Base
Feishu Base is a spreadsheet-style AI workflow building tool that supports batch AI creation and analysis tasks. Feishu Base has powerful collaboration features, supports multi-user real-time editing and comment discussions, and provides a rich variety of field types and views to meet diverse data management needs. Feishu Base integratesDeepSeek R1a full-power model, allowing users to create new AI field shortcuts in the spreadsheet and complete batch writing, analysis, and other tasks based on AI models, greatly improving work efficiency. In terms of workflow usage, it supports automation capabilities. Users set trigger conditions and execution actions to achieve automatic task assignment, reminders, and other operations. Workflows support more complex logic such as "conditional branches," making them suitable for complex processes with multiple nodes and effectively improving workflow efficiency and convenience.

Main features of Feishu Base
- Collaboration features: Supports simultaneous editing by multiple people and comment discussions, improving team collaboration efficiency.
- Personalized customization: Provides a rich variety of fields, views, dashboards, and plugins, allowing users to flexibly build customized business systems according to business needs.
- Automation capabilities: Based on automated processes, automatically executes tasks such as sending message notifications, freeing up manpower and improving work efficiency.
- Multiple views: Supports grid view, kanban view, calendar view, Gantt view, gallery view, and form view, making it convenient for users to display data in different ways.
- Data grouping and filtering: Set grouping by any field, support multiple grouping conditions, as well as data filtering and sorting functions.
- Dashboard: Supports adding various charts, such as bar charts, line charts, pie charts, etc., for data analysis and display.
- Advanced permissions: Add permissions for collaborators, control the visibility of row/column data, and achieve data isolation among members.
- Workflow: On the basis of automated processes, implements more complex logic such as conditional branches, suitable for complex processes with multiple nodes.
- Intelligent Q&A: Combines AI capabilities to conveniently query data in Feishu Base and quickly understand project progress, task completion progress, and more.
- AI-generated formulas: Based on input instructions, AI assists users in quickly creating application formulas and simplifying data processing.
How to use Feishu Base
- Visit the official website: Visit theFeishu Base official website , enter the invitation code New6A7v3H2d5M3i Get 3 months of Pro membership for free。
- Create a Feishu Base:
- Create a blank spreadsheet or select a template: Choose to create a blank Feishu Base, or select a suitable template from the template library.
- Create a data table: Click the "Create Data Table" button on the left side of the Feishu Base interface to enter different data.
- Manage data tables: Click the "⋮" button to the right of the data table name to rename, copy, or delete the data table.
- Field operations:
- Add field: Click the "+" button on the right side of the data table page to add a field.
- Edit field: Double-click any field name to change the field type in the drop-down menu, edit the field name, and format the field.
- Bind DeepSeek R1 (Web-enabled):
- Add AI Column: Click the "+" sign at the top → enter the title selection → [Explore Field Shortcuts] → search for "DeepSeek R1 (Web-enabled)".
- Generate Content with AI: In the "Enter Keywords" column, enter keywords, such as "AI prompts," "interpersonal relationships," "philosophy of success."
- View Management:
- Create New View: Click the "+" button to the right of the data table view to create a new view.
- Data Grouping and Filtering: Click the "Group" button in the data table toolbar to set grouping by any field, supporting multi-level grouping. It also supports data filtering and sorting features.
- Dashboard and Data Analysis: Click the "New Dashboard" button in the navigation bar at the bottom left, and select a chart type.
- Collaboration and Sharing:
- Share the Base: Click the "Share" button in the upper right corner of the data table to share the base with colleagues for collaboration. Supports inviting collaborators, sharing based on links, and setting viewing permissions.
- Adjust Sharing Scope: To narrow the sharing scope or cancel sharing, adjust "Link Sharing" to the organization or to disabled, and remove users who have been added as collaborators in "Manage Collaborators."
- Data Import and Export:
- Import Data: On the base data table interface, click the "+" button in the upper right corner, select "Upload Local File," and directly import local Excel and other files as a base.
- Export Data: Click the "..." button in the upper right corner and select "Export." It supports exporting as Excel/CSV or base files.
- Advanced Permissions and Automation:
- Advanced Permissions: Click the "Advanced Permissions" button in the upper right corner of the data table page to enable custom roles for advanced permissions. It supports controlling row/column data so that it is visible only to some people.
- Automation: Click the "Automation" button in the upper right corner of the data table, select "Create Custom Workflow" or a recommended workflow, and set trigger conditions and actions to execute.
- Use Base Workflows:
- Create Workflow:
- New Workflow: Open the base and click "Workflow" in the lower left corner to create a new workflow.
- Management Operations: Hover the mouse over the workflow name, click the "⋮" more actions icon on the right, and perform operations such as renaming the workflow or copying the workflow.
- Configure Workflow:
- Select Trigger Condition: In a blank workflow, click the button with the text "When a specified situation occurs," and select the trigger condition in the trigger.
- Set Trigger Condition: After selecting a trigger condition, the settings interface for that trigger condition will pop up on the right side of the screen.
- Select Action to Execute: After selecting a trigger condition, click the button with the text "then perform action" and select the action to be executed automatically.
- Editing and Management:
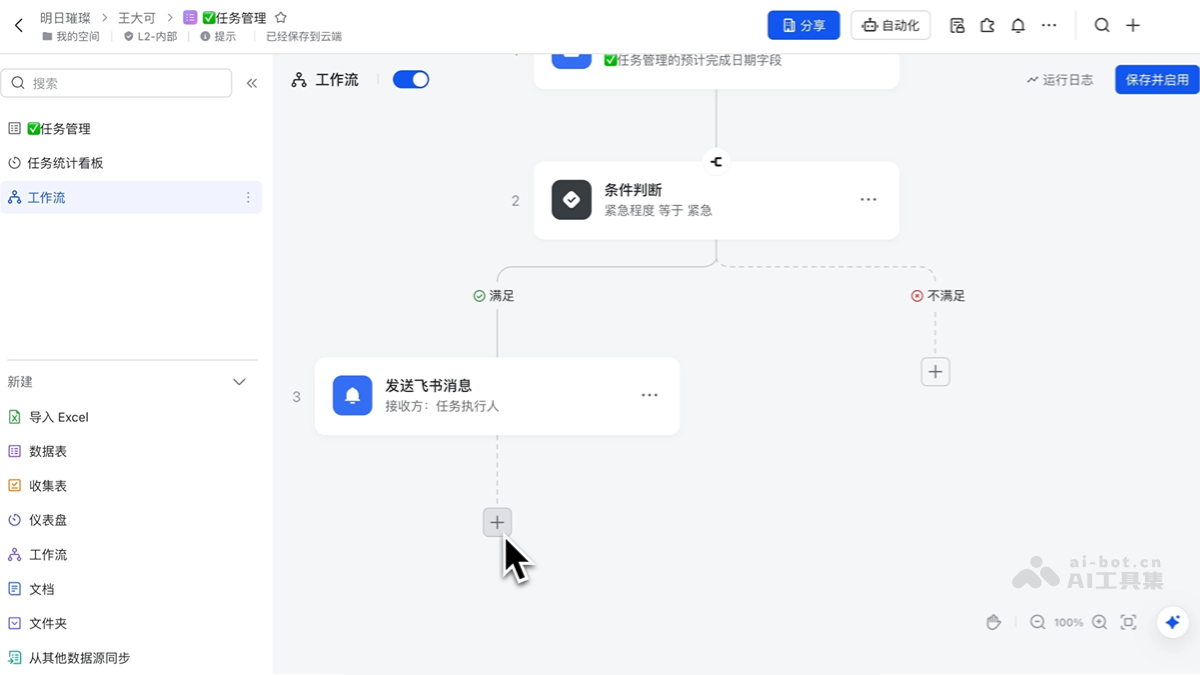
- Node Operations: After configuring the execution actions, the workflow nodes are arranged from top to bottom. Click the "+" icon at the bottom of the workflow to create a new execution action, or insert a new execution action between two existing nodes.
- Interface Adjustment: The workflow editing interface supports zooming, dragging, and auto-fitting.
- Node Movement: Drag each "Execution Action" node to change its order and position.
- Enabling and Run Logs:
- Enable Workflow: After configuring the workflow for the first time, click the toggle to the right of the workflow name or the "Save and Enable" button in the upper right corner of the canvas to enable the workflow.
- View Run Logs: Click the "Run Logs" button to the right of the workflow name in the left directory area, or click the "View Run Logs" option in the "⋮" more actions icon to view the workflow's running status.
- Create Workflow:
Application Scenarios of Feishu Base
- Project Management: Based on task lists and progress bars, clearly display task status and assignees.
- Customer Relationship Management (CRM): Manage basic customer information and interaction records for easy follow-up.
- Event Planning: List preparation tasks, plan the event process, and ensure the event runs smoothly.
- Human Resource Management: Record basic employee information, performance, and training records.
- Data Analysis and Reporting: Forms quickly collect data, automatically organize it into tables, generate charts and reports, and intuitively display data trends and analysis results.