
Friends,Seed-2.1-pro The large model has finally been upgraded, and Sister Dou is doing well too.
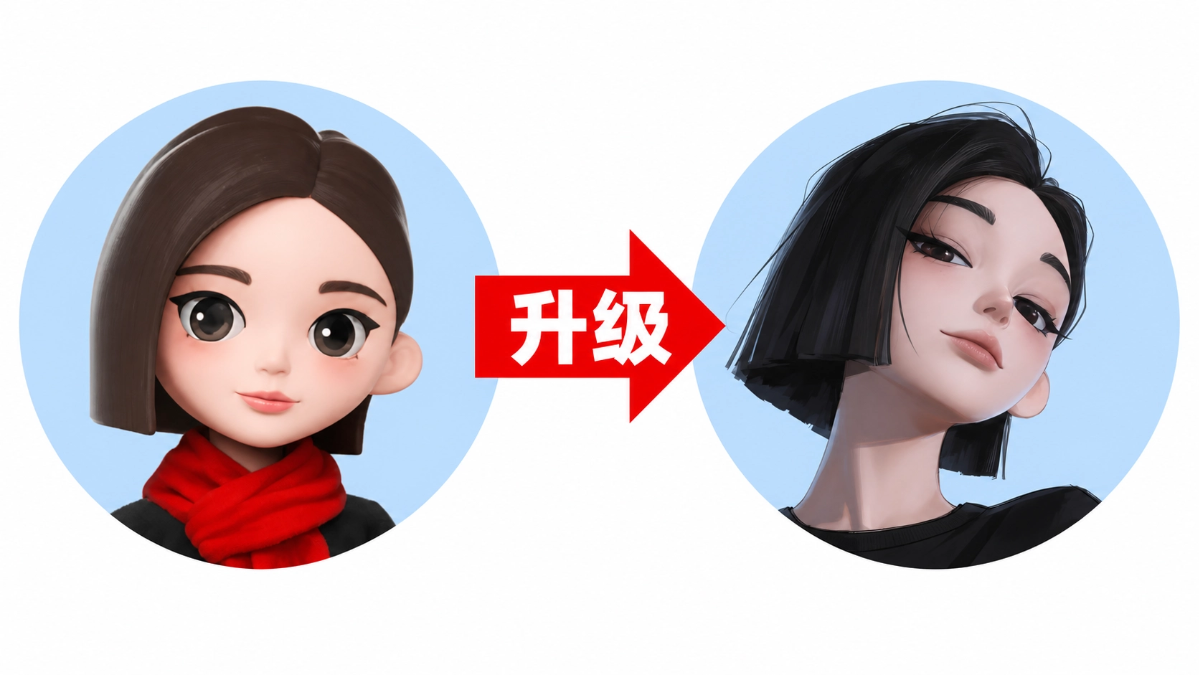
This time it has been updated to the Seed-2.1-pro-0915 version. The new version focuses on strengthening multimodal Coding and Agent capabilities. The model is better at understanding design drawings, interface screenshots, and complex documents, and then applying this information to actual work.
When writing code, the new version can better understand existing projects, find the locations that need to be modified, handle cross-file issues, and run checks. When reading financial reports, looking up information, and editing PPTs, its understanding of dense tables, details in images, and cross-page footnotes is also stronger, making evidence gathering, calculation, and delivery more reliable.
This round of updates also emphasizes Token efficiency, reducing consumption and usage costs while completing tasks.
However, no matter how good the upgrade sounds, being actually useful in hands-on testing is what really matters. Let me show you one of the cases, and it is really quite good:
01. Multi-Case Hands-On Test
For the model updated this time, you can connect to the API through Volcano Engine, or use it directly inDoubao Work. Most of the cases in my test this time were generated in it.
Case 1: 3D Construction Site
This case mainly tests the model's 3D spatial understanding, image-to-code, and complete development of complex scenes. The model needs to truly write the understood spatial relationships into the runtime logic so that the visuals do not show trucks passing through buildings or tower cranes colliding with each other.
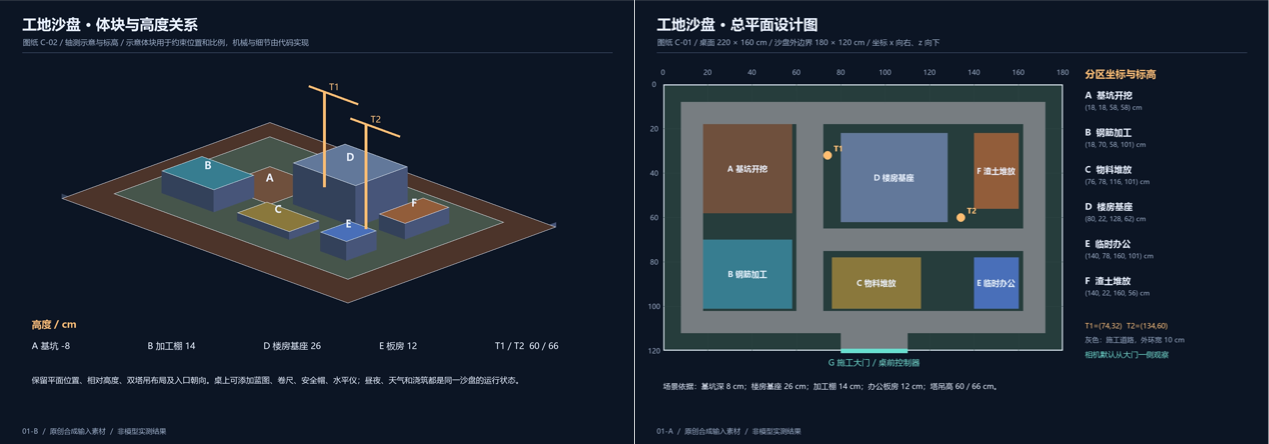
Reference image:
Prompt:
Based on the uploaded construction_plan.png and construction_massing.png, use WebGL and Three.js r160 to create a detailed, continuously operating "voxel miniature construction site diorama", delivering a single construction_diorama.html that can be opened directly by double-clicking in Chrome while online, without a local server or build step.
Three.js may only be loaded from the following CDN:
https://cdn.jsdelivr.net/npm/three@0.160.0/build/three.module.js
Other than that, do not load external models, images, textures, HDR, fonts, audio, or other libraries. All geometry, materials, textures, and graphical effects must be generated by code, and CSS, JavaScript, and shaders must all be inline in the HTML. If library loading fails, display a clear message and do not leave a blank page.
First read the image completely, identifying the coordinate directions, table and sandbox dimensions, boundaries of each zone, roads, entrances, tower crane positions, and key heights. The image is the source of these spatial parameters. Organize the identified values into scene_spec data, embed it in the HTML, and list the image-reading results and uncertainties in the delivery notes. Do not paste the design drawing on the ground to pass it off as a 3D reconstruction.
- Scene and Composition
The entire miniature construction site is placed on a dark solid wood worktable indoors, with code-drawn blueprints, a steel tape measure, a safety helmet ornament, and a metal spirit level scattered around the corners of the table. The default camera simulates an adult standing at the table observing, with a slight downward view, so the complete sandbox and the controller at the edge of the table can be seen clearly.
The construction site is divided into an excavation area, a rebar processing shed, a material stacking area, the foundation base of a high-rise building under construction, a temporary prefab office area, a muck area, and construction roads. The zones, entrances, positions of the two tower cranes, and elevations are restored according to the drawings, and the whole can be uniformly scaled; the proportions and relative positions must not be changed arbitrarily. Roads and pedestrian routes must be recognizable. Maintain rich yet coordinated colors, obvious voxel granularity, and a realistic sense of miniature scale.
- Dynamic Machinery and Operation Relationships
Include at least 2 excavators, 3 muck trucks, 2 tower cranes, 1 concrete mixer truck, and 1 small loader.
The excavator performs the motions of digging soil, raising the arm, slewing, and loading onto trucks; the truck runs in a cycle of waiting, entering position, receiving soil, traveling fully loaded, unloading, and returning. The soil volume in the truck bed must change with loading and unloading, and loading must not begin before the vehicle has come to a complete stop.
The tower crane slews, luffs or trolleys, and raises and lowers the hook to lift and transport rebar and concrete buckets. The load, slings, and hook remain connected, and the lifting path avoids the building body and other tower cranes. The mixer truck's drum rotates, and the loader levels the ground within a defined area.
- Workers and Details
At least 32 voxel workers are distributed across different positions: tying rebar, carrying building materials, directing lifting operations, operating tools, and patrolling at the entrances and exits. Their motions are staggered in rhythm to avoid all of them swinging in unison.
Complete the enclosure gate, warning bunting, construction indicator lights, temporary lighting, scaffolding, rebar piles, cement piles, sand and gravel piles, utility poles, and safety signage. Workers, equipment, and materials must be consistent in scale; signage and blueprints can be generated with CanvasTexture.
- Day-Night Cycle and Simulated Weather
Implement a smooth cycle of dawn, noon, dusk, and night, expressed jointly through the sky outside the window, the light entering the room, and the construction site lights, while always preserving the scene relationship of the indoor desktop sandbox.
At night, the construction site floodlights, tower crane lights, and the warm window lights of the prefab buildings turn on, and dust particles drift slowly.
The spacebar toggles simulated heavy rain: raindrops appear only within the sandbox area, the ground gradually becomes wet and reflective, the construction lights brighten, dust weakens, vehicles slow down, and the tower crane pauses lifting after completing the necessary safe parking. After the heavy rain is turned off, it smoothly recovers, and equipment or suspended loads must not teleport.
- Camera and Physical Controllers
Drag the mouse to look around, and use the scroll wheel to zoom; after a few seconds of inactivity, it automatically orbits slowly, and automatic orbiting stops immediately upon interaction. Limit the camera height, distance, and angle so it cannot penetrate the tabletop or the model.
Create clickable physical knobs or levers in front of the tabletop, implemented through ray picking: equipment speed 0.5x/1x/2x, day-night cycle on/off, and dust intensity low/medium/high. The controllers need recognizable labels, state feedback, and rotation or toggle animations, and cannot be replaced only by on-screen floating buttons.
Distinguish clicks from drags, so that dragging the camera does not accidentally trigger switches.
- Add a "Nighttime Concrete Pouring" Scene
Add a physical desktop button; when clicked, it demonstrates nighttime pouring within the same sandbox: the camera smoothly focuses on the building foundation, construction lighting turns on, the mixer truck drives in along the road, workers guide it, the vehicle stops and then extends the discharge chute and unloads, and after the operation is completed, it retracts the discharge chute and leaves along the road.
Provide an operation to return to regular work. When entering this scene, pause the automatic day-night changes, and restore the original settings after exiting. If it is currently in heavy rain, first show waiting or enter a safe paused state, and do not force work to start. Preserve the spatial and equipment states of other areas within the sandbox.
- Collision and Boundaries
Plan spatial occupancy and safe operating ranges first, then implement motion. Vehicles use routes with following distance and intersection yielding; manipulator arms, crane booms, and suspended loads are constrained within their respective working ranges; personnel avoid vehicle lanes and lifting areas. This can be implemented with state machines, bounding boxes, and predefined safe trajectories.
Except for intentionally designed construction contacts such as bucket digging and material dropping, there must be no visible vehicle interpenetration, suspended loads passing through buildings, personnel passing through vehicles, or crane booms colliding. All construction site models and their motion envelopes remain within the sandbox, and raindrops and dust must not fall outside the table. These constraints must still hold after global speed adjustment.
- Performance and Delivery
The optimization target is near-stable 60FPS at 1920×1080. Repeated voxels, worker parts, fencing, and stockpiles heavily use InstancedMesh, reusing geometry and materials; dust and light halos are implemented with custom shaders. Control the number of projected light sources, shadow cost, and particle count to avoid creating a large number of objects per frame.
Adjust the render pixel ratio, shadow resolution, and particle density when necessary, but do not remove major construction areas, machinery, or functionality in exchange for frame rate. Display the actually measured FPS in a corner, collapsible; do not hard-code performance numbers.
Open the HTML yourself and compare the 3D scene with the two reference images from the same viewing direction, checking the zones, quantities, and heights, then check the complete loading/unloading cycle, two tower cranes, physical controller, nighttime pouring, rainstorm switching, and camera boundaries, then fix any issues found. When performance has actually been tested, record the resolution, pixel ratio, browser, and frame rate; when not tested, state this honestly and do not promise stable 60FPS on all hardware.
The final delivery is a complete single HTML file, with brief operating instructions and actual verification results. Do not provide only screenshots, concept explanations, code snippets, or a project directory requiring additional assets.
The excavation pit, processing shed, building under construction, and transport roads are placed in the correct positions, while the tower cranes and vehicles add a sense of motion to the scene. Press the spacebar, and clear weather switches to heavy rain, with raindrops and lighting changing accordingly. Short sampling after loading is close to 60FPS, achieving both complexity and runnability.
Case 2: Robot Warehouse
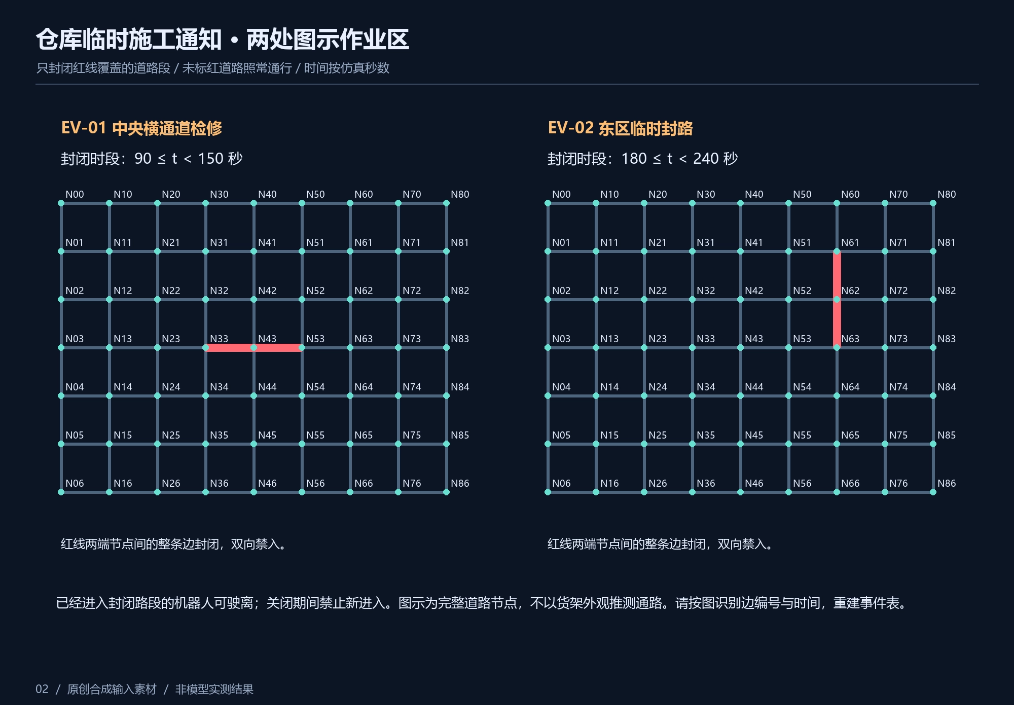
This case mainly tests visual information localization, business rule understanding, and long-task execution. Block one road incorrectly, and the subsequent routes and order results will be affected. The finished product needs a rotatable 3D warehouse, with robots, transport trajectories, congestion heatmap, and order progress changing together.
Blockage map:
Prompt:
Based on the provided warehouse.json, orders.json, 数据说明.txt, and roadwork_notice.png, create a locally runnable "Warehouse Robot Dispatch Center".
warehouse.json provides the basic road network and rules, and orders.json provides orders. The locations and times of the two temporary road closures are given only in roadwork_notice.png. Please identify the road edges and time intervals corresponding to the red lines, save them as events.parsed.json, and implement dispatch accordingly. The node numbers in the image match the basic road network, and the image must not be treated as decoration that does not need to be read.
Visual requirements:
– The main view is a rotatable, zoomable 3D warehouse, with shelves, pickup stations, outbound stations, and robots placed according to the map.
– Use industrially textured shelves, recognizable cargo boxes, robots in different colors, and clear route trajectories. Robots should have a visible loaded state after loading.
– Use a dark console, cool-toned lighting, and a small amount of orange warning. When a road is closed, display fencing and red alerts, avoiding full-screen decoration that obscures operational conditions.
– Configure an order queue, robot status, event timeline, and congestion heatmap, suitable for 16:9 screen recording.
Simulation requirements:
- Receive orders according to release time; each robot executes one order at a time, and delivery is counted only after pickup, loading, transport, and unloading are completed.
- Follow the node occupancy, road capacity, and travel time rules in the data, handle head-on conflicts, contention for the same node, and station blockage, and do not pass through shelves or teleport.
- Automatically handle the two road closure events. During a closure, new entry into the relevant roads is prohibited, while robots that entered before the closure are allowed to leave; reroute when necessary.
- Display pending, in-progress, completed, and overdue orders, as well as actual mileage, on-time rate, and robot utilization. Clearly state the statistical criteria; all numbers are calculated from runtime status.
- Ensure all orders are ultimately handled; if a state occurs from which it cannot continue, display the reason and retain logs; do not fake completion.
Interaction requirements:
– Run, pause, reset, and 1×/2×/4× speed.
– Click a robot to follow it with the camera; click an order to view pickup and delivery locations and the executing robot.
– Support switching between 2D top-down and 3D views.
– Replay the operation process that has already occurred through the historical timeline; replay must not tamper with the original records.
Scheduling uses fixed ordering and a random seed, and results are reproducible after reset; switching speed only changes playback speed. There is no need to simulate batteries, charging, or connect to real devices.
Deliver the source code, startup instructions, events.parsed.json, complete run logs, and verification results. For each road closure event, attach the source image region to facilitate checking the image reading. Actually check whether orders are missed or completed repeatedly, whether road or node
All four robots delivered all 60 orders, and during road closures they did not force their way into restricted road sections. This shows that the map, orders, and road closure notices have entered the same scheduling logic, and that movement in the 3D warehouse is based on data.
Case 3: Laser Game
This case tests visual symbol understanding, image localization, and game development. The model must both read the positions of mirrors and walls correctly and implement reflection, loop detection, and solving rules.
Initial level image:
point conflicts, and whether road closures take effect. Run the page yourself, fix the problems found, and then deliver the finished product.
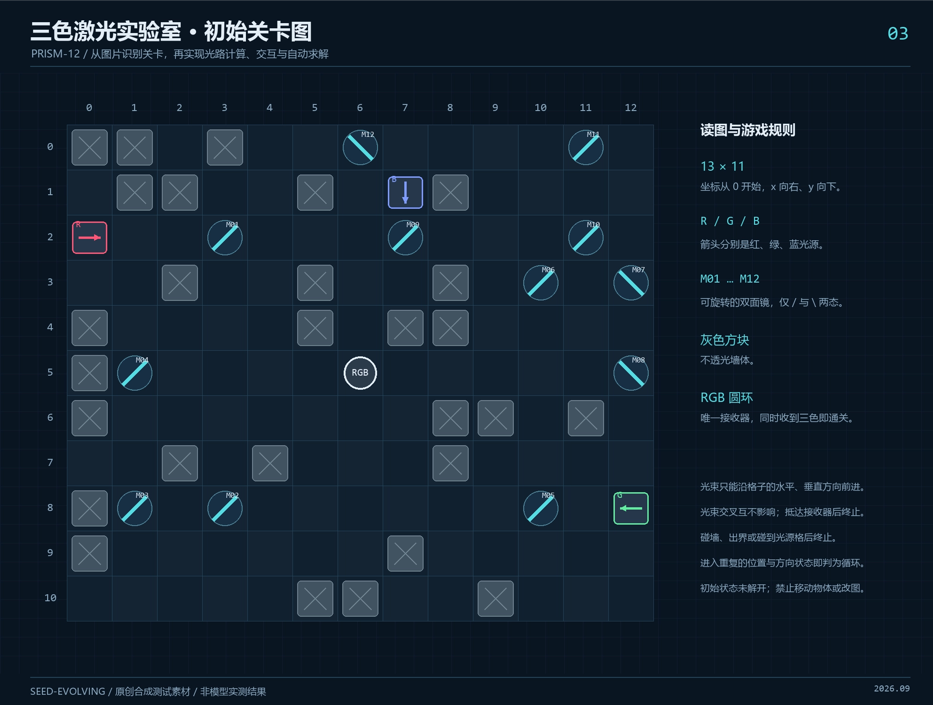
Rules:
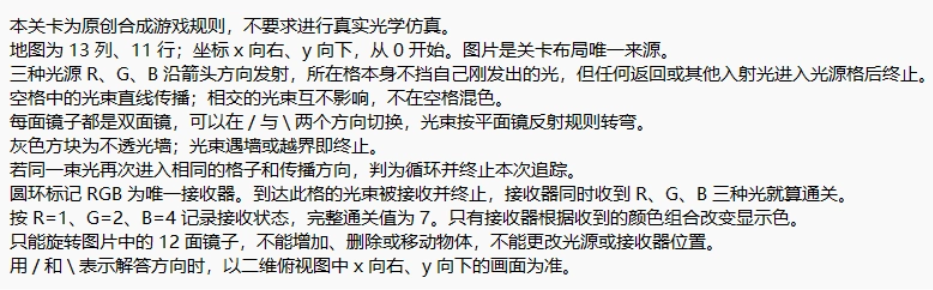
Prompt:
Based on the uploaded laser_puzzle.png and rules.txt, create a locally runnable "Tricolor Laser Laboratory" puzzle game.
The image is the sole source of the level layout. First identify the grid size, the positions and directions of the three light sources, the positions and initial directions of the 12 mirrors, the walls, and the receivers, and save them as a separate level.json for verification.
Do not replace the level or move objects on your own, and do not set the mirrors to the cleared state in advance.
Visual requirements:
– Restore the 2D level as a floating 3D laboratory bench, provide top-down and angled top-down views, and retain recognizable coordinates.
– Walls have height, mirror surfaces have 3D supports, and the three-color light beams are clearly traceable, with moderate glow and particle flow effects.
– Mirror rotation has smooth animation; the receiver changes its displayed color according to the colors actually received, and when all three colors are present, it triggers an energy convergence and level-clear animation.
– The page includes the level main view, mirror operation count, received color status, and a concise control panel, suitable for 16:9 screen recording.
Game requirements:
- Click any mirror to switch between the / and backslash directions, and recalculate all light paths.
- Strictly handle reflection, wall blocking, going out of bounds, entering light source cells, and loop states according to the rules; light beams cannot pass through walls. Different beams crossing in empty cells do not affect each other.
- The receiver must receive all three colors R, G, and B simultaneously to count as cleared, and the determination must come from the current light path calculation.
- Support undo, restoring the initial state in the image, playing the light path segment by segment, and clicking to view the number and direction of each mirror.
- Implement an automatic solver that searches for combinations of mirror orientations based on the recognized level. Provide "hint one step" and "demonstrate the complete solution"; during the demonstration, rotate the mirrors one by one and update the light paths in sync.
- The solving function and player operations must use the same set of light path rules; a hard-coded list of orientations must not be treated as the search result.
Please complete the image reading, implementation, run checks, and fixes yourself. Deliver the source code, startup instructions, level.json, solving results, and verification records. Actually verify that the initial state is not cleared, that after solving the three-color reception requirement is satisfied, that rotation and undo are both correct, and that a cyclic light path does not cause the page to freeze.
The rules and layout in the image were indeed read into the program. The 12 mirrors correspond to 4096 combinations, and the program found the unique solution. After flipping 7 mirrors, all three beams of light entered the receivers.
Case 4: PPT revision
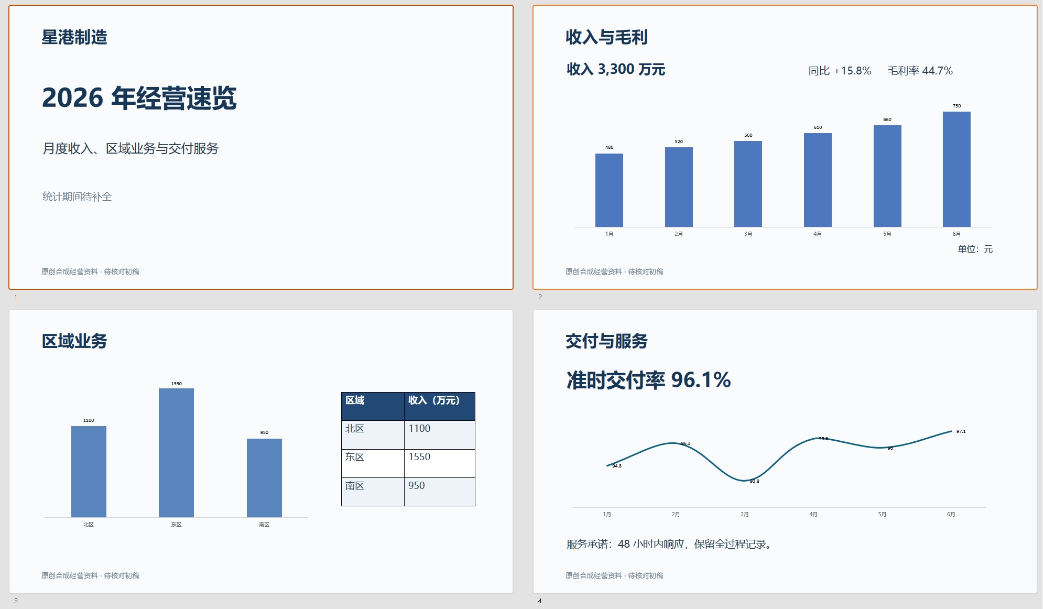
This case tests image-text comprehension and Office delivery capability. Revision must balance global consistency and local preservation, and revenue, gross margin, and delivery rate also need to be recalculated. Completing the revision, rendering, and read-back check in one request demonstrates office capability better than merely generating a pretty page.
Original PPT:
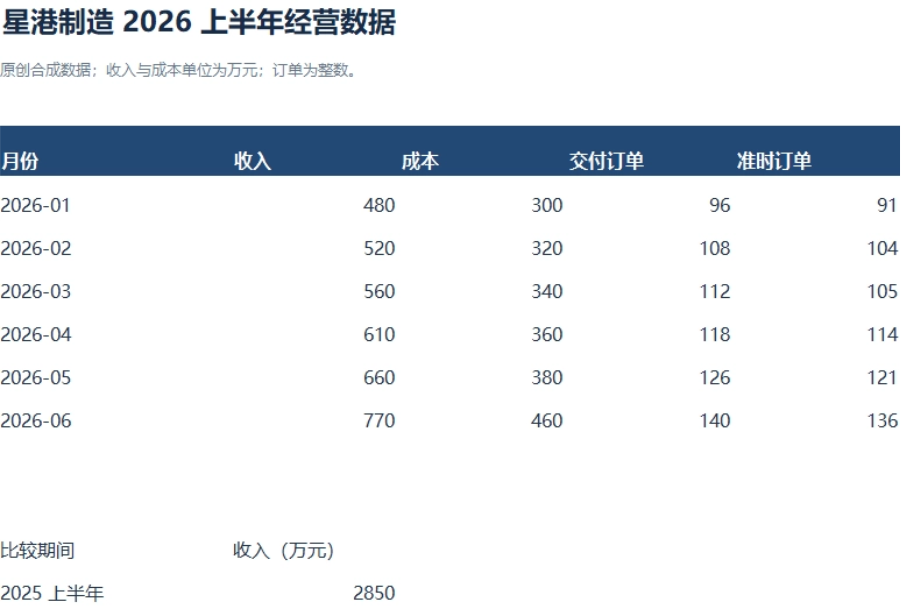
Original data:
Revision comments:
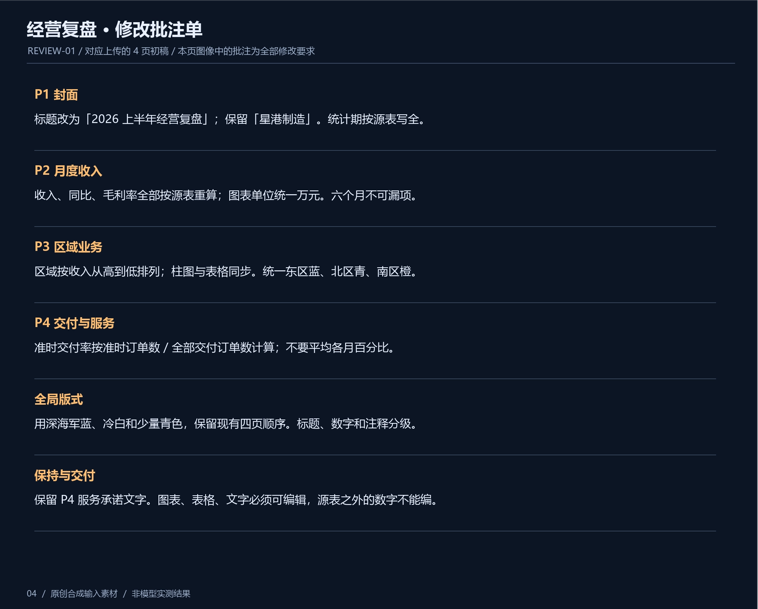
Prompt:
Please revise "Business Review_Draft.pptx" according to all comments in review_notes.png. Business Data.xlsx is the source of the values, and "Original Draft Page 2.png" is used to verify the original layout. All content is synthetic test material.
First recognize the image comments, and map each requirement to the specific page number, object, and scope of modification. The colors, ordering, content to preserve, and statistical requirements in the comments all need to be implemented; do not skip the image and directly apply a generic template.
- Keep the original four-page order and themes, and update the title, statistical period, key figures, charts, regional ordering, color scheme, and annotations according to the comments. Preserve the text specified in the image as unchanged.
- Recalculate the summary values, year-over-year change, gross margin, and on-time delivery rate from the source table. Formulas, units, and denominators must be consistent, and related figures throughout the text and charts must be updated together. Keep missing data in the source table as gaps; do not fabricate them.
- Complete the full layout according to the visual direction in the comments, using a clear numerical hierarchy, sufficient white space, and consistent chart styles. Improve the readability of charts and figures, maintain 16:9, and avoid dense explanations blocking the graphics.
- Deliver an editable "Business Review_Revised.pptx"; keep text as text boxes, and keep charts and tables as editable objects. Do not flatten pages into images, and do not rewrite or overwrite the uploaded original draft and source table.
- Also deliver calculations.json, recording the formulas, data ranges, units, and results for each metric; provide a comment implementation checklist that can be mapped to the final page numbers and objects.
- Generate a preview image for each page, actually check for occlusion, overflow, text truncation, and chart misalignment, then read back the final PPT to verify the page count, figures, and preserved content. After the check is complete, state the actual delivery status; do not claim everything is correct based only on writing the file successfully.
Complete all modifications in one pass and handle issues yourself during the process. If the environment truly lacks editing or rendering tools, truthfully explain the missing capabilities and unfinished steps; do not use screenshots to pass off as editable files.
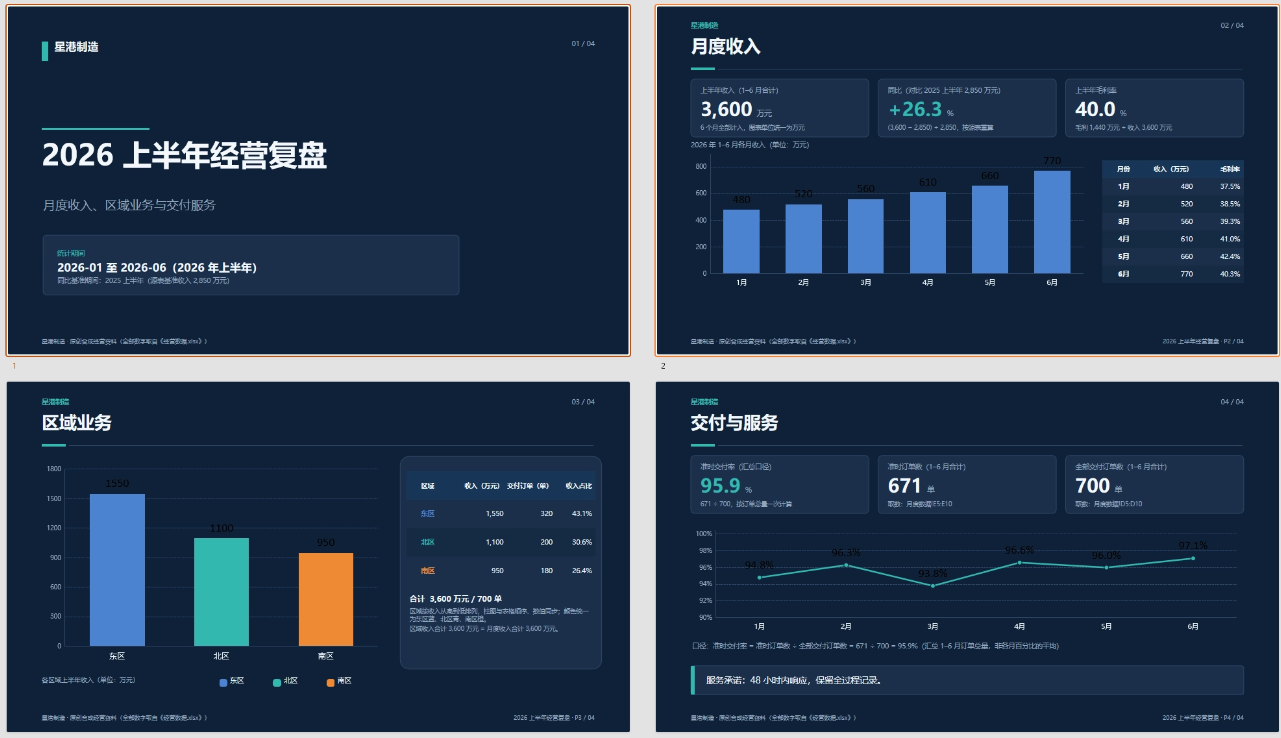
Revenue was topped up to 36 million yuan, gross margin recalculated to 40.0%, and on-time delivery rate also obtained by dividing 671 orders by 700 orders to get 95.9%. The order and colors of the regional chart were changed together, and the required service commitments are still retained. The delivered PPT contains native charts, tables, and text, and can continue to be edited afterward. The visual style is steady and businesslike, and the highlight is that the annotations, source data, and final page basically match up.
Case 5: Delivery Verification
This case tests dense image-text parsing, cross-source verification, and the reliability of tool calls. The model needs to handle duplicate exports, acceptance revisions, returns, and cross-month events, then trace every number back to evidence.
Factory registration:
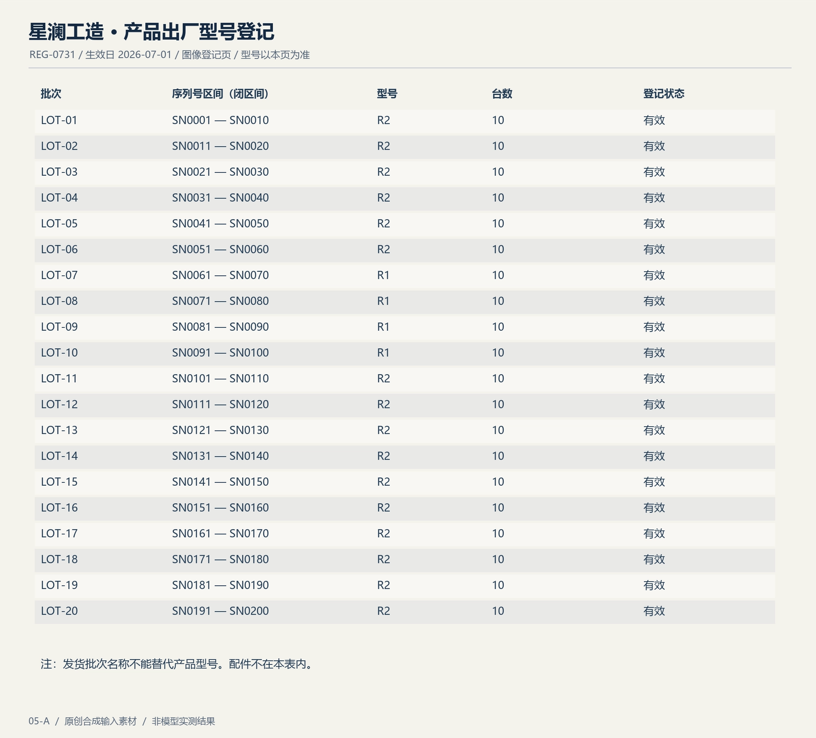
Acceptance form:
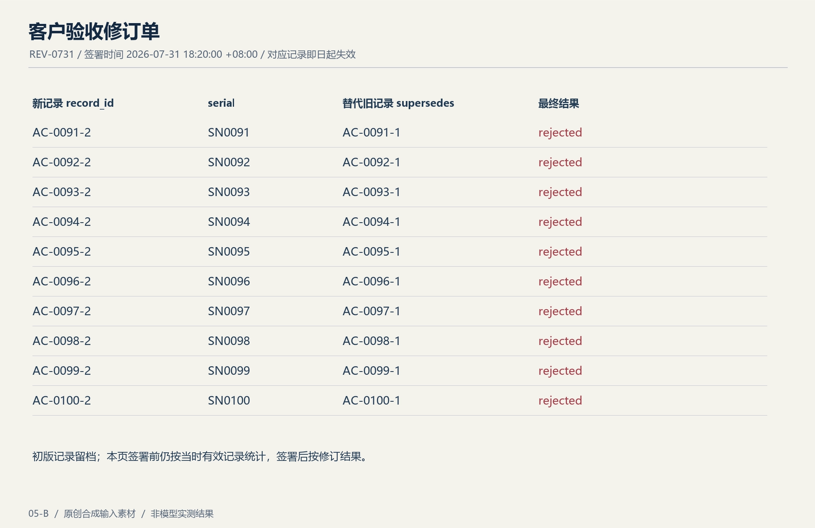
Enterprise materials:
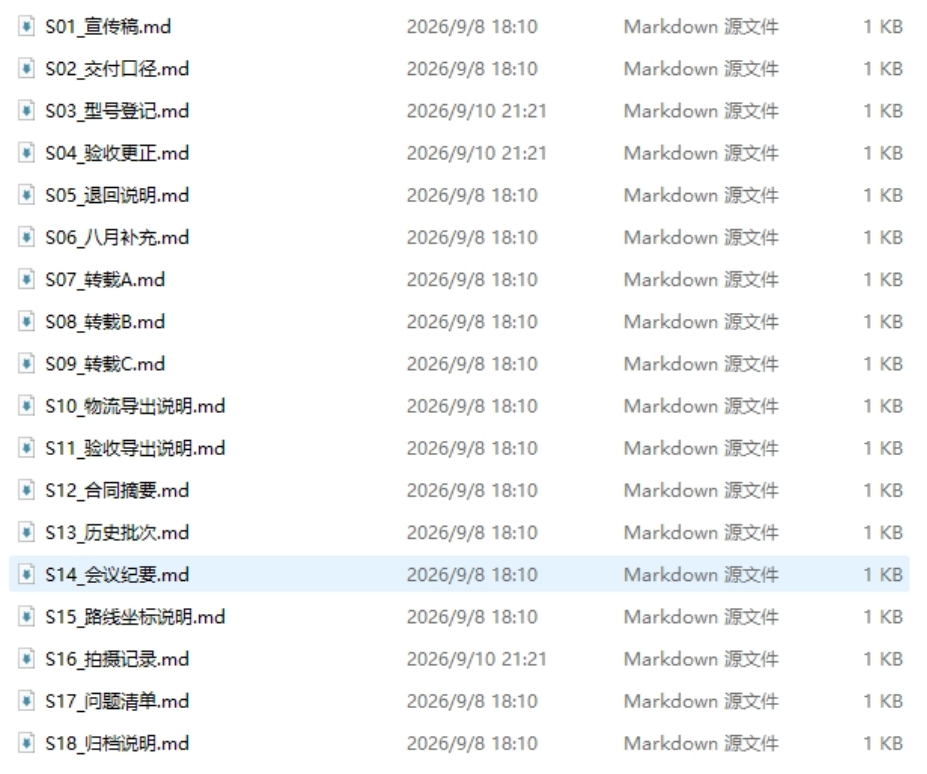
Prompt:
Please verify the three claims about the fictional enterprise "Xinglan Gongzao" in the uploaded materials, with the statistical cutoff uniformly set to 2026-07-31 23:59:59, time zone Asia/Shanghai:
– The first batch of 200 robots has all been delivered.
– Of these 200, 80%, or 160 units, have completed customer acceptance.
– All delivered robots are of the R2 model.
Using the provided files as the evidence boundary, please read the task scope, statistical criteria, logistics and acceptance exports, revision notes, as well as registry_scan.png and acceptance_revision_scan.png, and independently provide verification conclusions.
The two scanned pages contain necessary information: model registration is only in registry_scan.png, and the revisions in acceptance_revision_scan.png have not yet been merged into the acceptance JSON. First extract the structured registration and revision records from the images, then merge them with the details for verification. Citations need to indicate the file, page number, or image region, and fields that cannot be identified must retain uncertainties.
It is necessary to distinguish products from accessories, pre-created waybills from actual pickup, and customer receipt from acceptance. Handle duplicate events and revised records, and reconstruct the state as of the verification cutoff; events that occur later must not change the completion status at that time. Identify the source relationships among reposts, and do not treat duplicate publicity as independent evidence.
Create a locally runnable "Delivery Evidence Command Console":
- Display cargo flows using a three-dimensional factory, warehouse, and customer nodes, distinguishing in-transit, received, returned-to-warehouse, and other connections according to the actual verification status. The coordinates in locations.json are only used to synthesize the scene and do not correspond to real geographic locations.
- The page retains three claim cards, each showing the verification conclusion, supporting evidence, counterevidence, and evidence gaps.
- Set up a draggable historical timeline, and when switching, reconstruct the logistics and acceptance status as of that moment. Provide a button to return to the fixed verification cutoff.
- Clicking numbers, product nodes, or evidence connections can expand the original records and locate the file name, event_id, record_id, or the specific region in the image.
- Use a source relationship graph to show the association between promotional articles and reposts, avoiding depicting the same message as multiple independent supports.
- Use a dark console, concise three-dimensional buildings, dynamic flows, and an appropriate amount of warning highlighting to ensure text and evidence are readable.
Deliver a runnable project, image-extracted JSON, a report for each claim, a state reconstruction script, and a complete citation list. Retain the original image region corresponding to each revision and the superseded records, and support click-to-view. Values must be reproducible from the original data, percentages must clearly state the denominator; when evidence is insufficient, preserve the gap and do not fabricate reasons or external materials.
Self-check whether the data summary, timeline playback, source jumps, and three-dimensional display are consistent, fix issues, and then deliver.
120 units were accepted upon receipt; after deducting the 10 returned units, only 110 units remained as net delivery; then, incorporating the acceptance revisions in the scanned documents, the number that actually passed acceptance was 90 units, accounting for 45% of the original plan. Among the delivered machines, 40 units of R1 were also mixed in, and counter-evidence was found for all three claims in the prompt.
Case 6: Read financial statements, build an operating model
This case mainly tests dense image-text reading, cross-page footnote comprehension, and analytical delivery.
Financial statements:
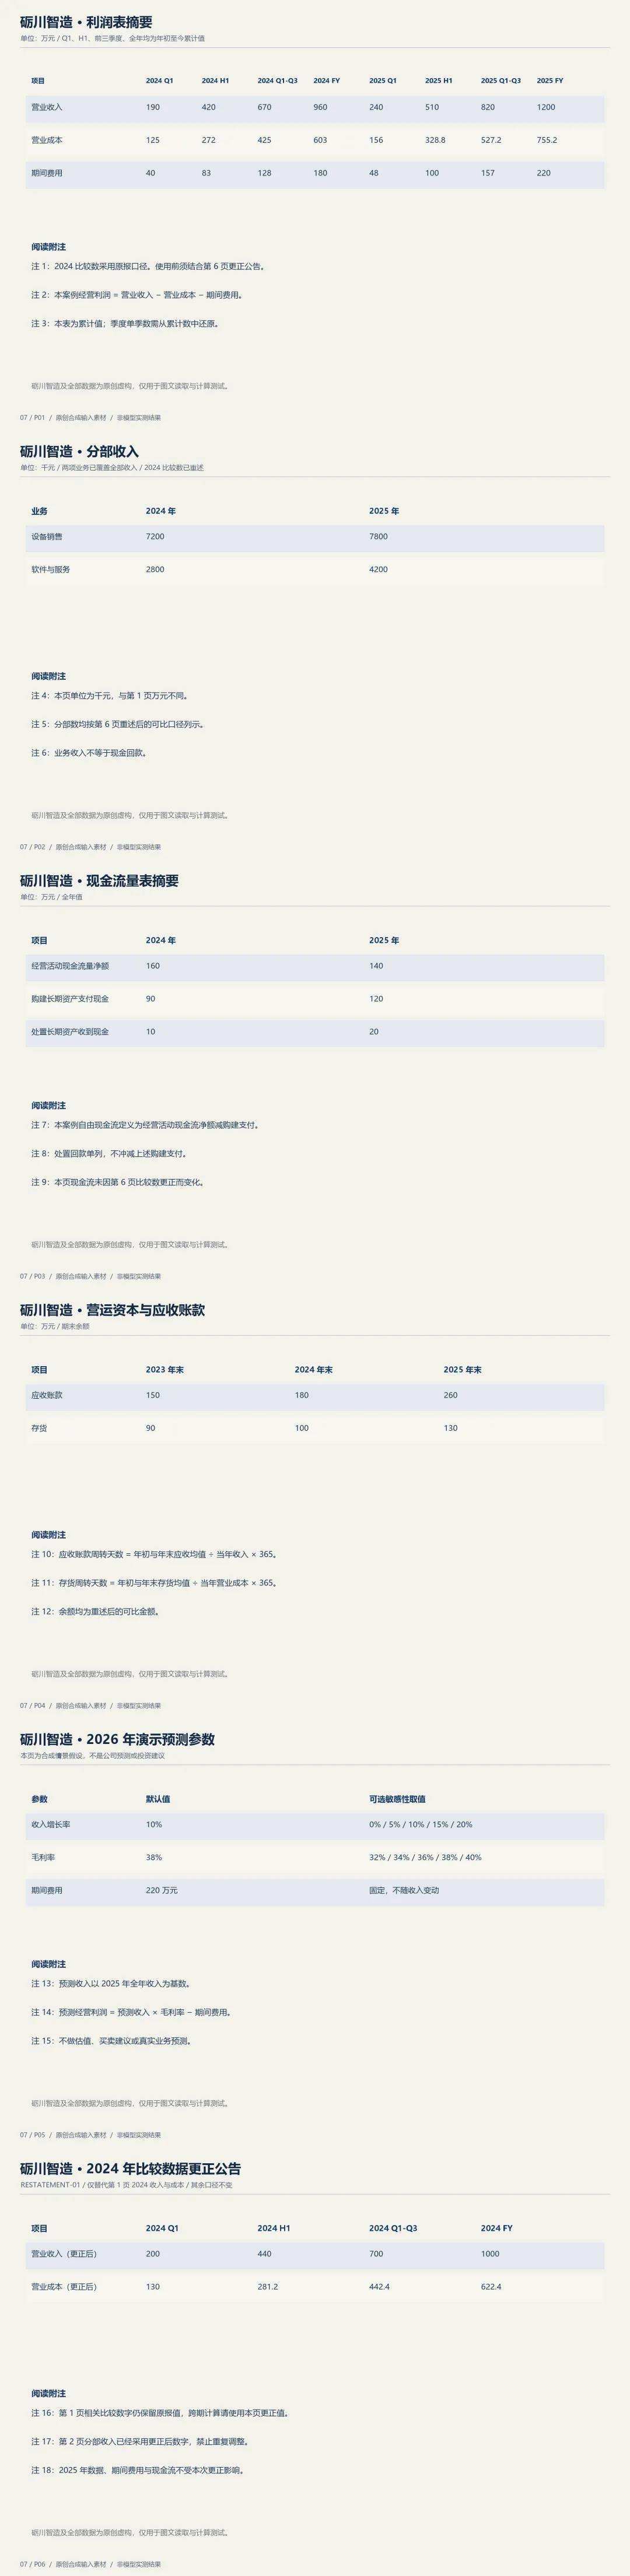
Prompt:
Please read the uploaded images of "Lichuan Smart Manufacturing" financial materials, complete a reproducible operating analysis, and deliver an Excel model with formulas and a locally runnable interactive operating dashboard.
All financial values and calculation bases come from the images. First identify headers, years, cumulative periods, units, and notes, then extract structured data. After reading all pages, confirm whether there are revisions, unit differences, and cross-page references; do not read only the first page or treat every column as a single quarter.
Analysis requirements:
- For each extracted value, record the original value, unit, period, final adopted value, page number, and image region. When corrections exist, retain the original value and the replacement relationship to avoid duplicate adjustments.
- Unify the monetary unit, restore the single-quarter revenue and cost for the four quarters of 2024 and 2025, and calculate annual revenue growth, gross profit, gross margin, operating profit, and free cash flow.
- Verify segment revenue against total revenue, calculate accounts receivable and inventory turnover days according to the conventions in the images, and analyze whether changes in revenue, profit, and cash flow are consistent. Conclusions may only be supported by the materials; do not fabricate business reasons.
- Build a 2026 scenario forecast and a two-dimensional sensitivity table according to the parameters on page 5. Assumptions remain editable, and forecasts and charts update automatically after modification. Clearly distinguish historical values from scenario values.
Delivery and visual design:
– model.xlsx contains raw extraction, basis adjustments, historical calculations, and scenario analysis. Calculation results use inspectable formulas, with source page numbers placed next to the corresponding data; do not write all results as constants.
– The interactive dashboard uses an operating display stand with spatial hierarchy: revenue segments, quarterly trends, profit and cash flow bridge charts, and sensitivity heatmaps linked around the same selected year group. Maintain accurate proportions, coordinates, color scales, and numbers; do not distort statistical relationships for three-dimensional effects.
– Clicking a metric expands the calculation process and source images, locating the corresponding table or footnote. When adjusting forecast parameters, the dashboard and the exported model use the same basis.
– Provide extracted_data.json, analysis scripts, calculation results, and a brief report explaining anomalies, revisions, and evidence that is still missing.
Run the calculations yourself, spot-check differences before and after corrections, cumulative-to-single-quarter conversion, unit conversion, summary reconciliation, and formula updates; render and read back Excel, and open the web page to check linkage and source jumps. Report the checks actually completed; do not fabricate tool results or call records.
The materials are entirely a fictional case; do not perform real enterprise valuation, investment advice, or supplement with external materials.
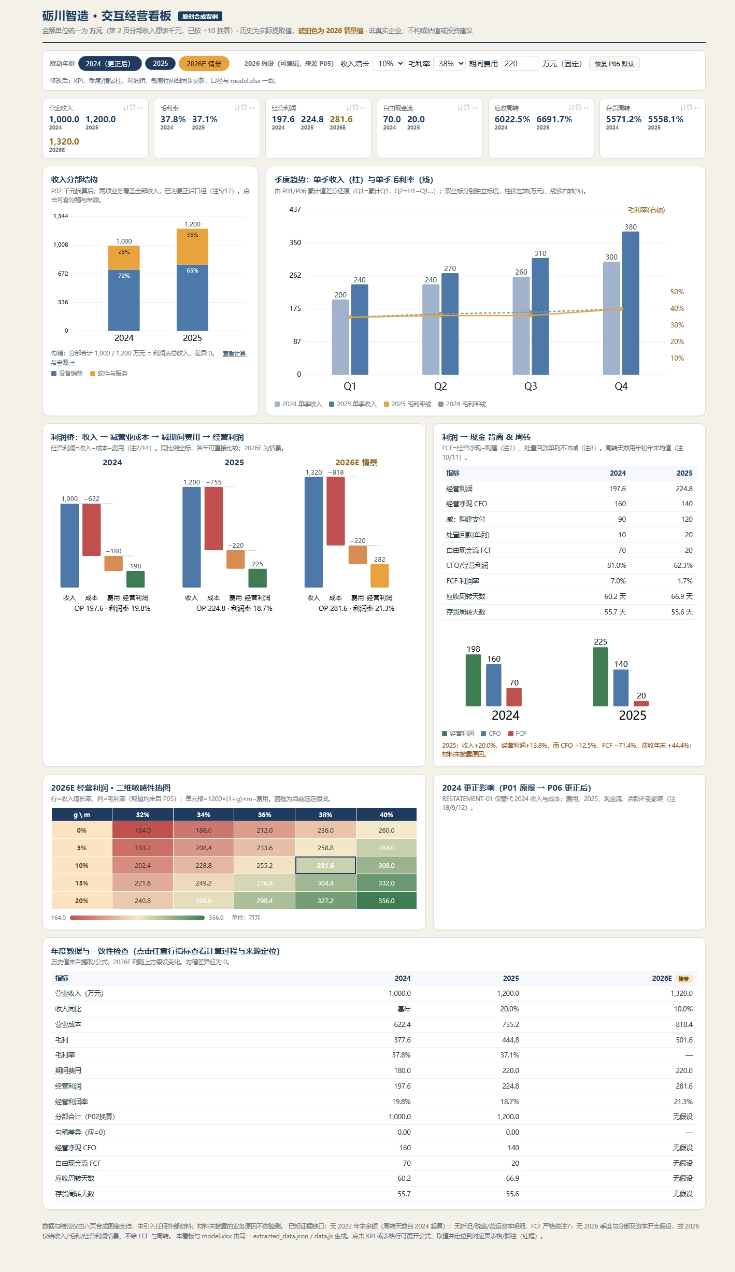
In this set of financial statement questions, the difficulty is hidden in the page conventions. The earlier pages still retain the originally reported data, while later pages provide a correction announcement, and there are also differences between thousands and ten thousands, and between cumulative and single-quarter values. The final model adopted the corrected comparative figures, calculated revenue year-over-year as 20%, and after the scenario parameters changed, the Excel formulas and web calculations also produced corresponding results.
Case 7: Make a white model, then generate a video
Recently, the video production process of first making a white model and then generating a video has become very popular, because this can ensure that the video's visual direction is very accurate.
So this time, let Seed-2.1-pro-0915 first build a whitebox via Blender MCP, arrange the character actions and camera, and then hand the preview video to Seedance to generate the final cut. You can see Seed-2.1-pro-0915's 3D spatial understanding, complex action choreography, and its ability to call Blender to complete modeling, animation, inspection, and export.
Whitebox layout diagram:
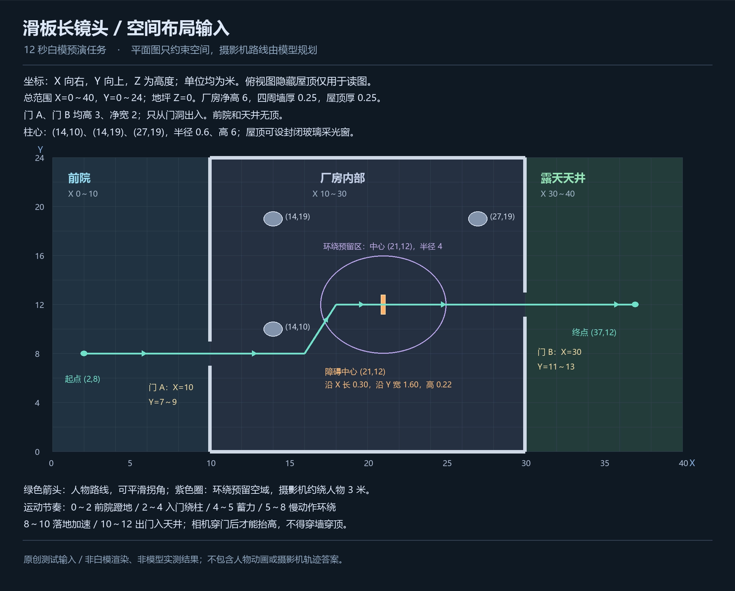
Prompt:
Blender is already installed on my computer. In the current Claude Code environment, first check, configure, and connect Blender MCP yourself, then read the uploaded layout_plan.png and create a 3D whitebox preview animation in Blender of 'a skateboarder passing through an old factory building'. Deliver an editable project and the actually rendered video, for Seedance to later reference the character actions, spatial layout, camera, and speed rhythm.
Zero, first complete the Blender MCP connection, then start production
I authorize you to install the missing uv and Blender MCP for this task, configure the MCP service for the current Claude Code project, start a dedicated working instance of local Blender, and perform a connection check. Reuse the installed Blender and available dependencies, and preserve the existing project, other MCP configurations, as well as the current model and API routing. Directly perform ordinary installation, configuration, and connection work; do not just return a tutorial for me to follow.
- Check the current operating system, whether Claude Code is running on Windows locally or in WSL, the Blender executable path and version, and the status of uv, uvx, and any existing Blender MCP. If a usable connection already exists, reuse it directly; if not connected, first look at the actual error, then fill in missing dependencies. Install only from the official uv entry point and channels provided by the Blender MCP project maintainers, and record the actual paths and versions used.
uv installation instructions:https://docs.astral.sh/uv/getting-started/installation/
Blender MCP:https://github.com/ahujasid/blender-mcp
Claude Code MCP:https://code.claude.com/docs/en/mcp
- Install or locate the Blender add-on matching the MCP service; you may refer to uvx blender-mcp install-addon in the current project documentation. Prefer using the local Blender's Python startup script to enable the add-on in the dedicated instance and start the listening service required for the connection; the specific modules and startup interfaces must be based on the installed add-on code, not guessed. If GUI operations are unavoidable, first use the currently available desktop control tools to complete them.
- Add or fix a stdio MCP service named blender in the current project. Based on the current CLI help, use claude mcp add –transport stdio –scope local blender — <absolute path to uvx> blender-mcp, where the path must be replaced with the actual path found. First check the existing configuration to avoid duplicate additions or overwriting other services. Based on the actual runtime environment, verify the add-on's host address, port, and process, and confirm that the service connects to the Blender instance used for this task.
- Through actual MCP requests, read the current scene information and obtain a corresponding viewport screenshot, then check that the returned content matches the real scene. A successful configuration write, an accessible port, or claude mcp list showing Connected cannot by itself be taken as proof that Blender is already operable. After the two actual calls pass, directly continue with the production task below, and do not ask again whether to start.
- If the current session cannot load new tools, or if a step truly requires manual clicking or permission confirmation, first complete the remaining executable configuration, save the full task, completed steps, and next step to CONTINUE.md, and then tell me only the one operation that must be completed. If needed, explain how to reconnect in /mcp, or restart Claude Code and restore the current session and read CONTINUE.md. Do not terminate the current session yourself, do not make me copy the entire requirement again, and do not write an unfinished connection as successful. Such necessary environment operations should be recorded separately and do not count as completed by the model itself.
In check_report.md, record the initial environment setup time, manual operations, and subsequent modeling and rendering time separately. When comparing the new and old models, use the same prepared connected environment to evaluate production capability.
Total length 12 seconds, 24 FPS, 288 frames, 16:9, 1280x720. The entire film uses one continuously moving camera with no cuts. The building, character, skateboard, and props are all created with Blender Python, using gray-white materials and clear contact shadows; the character and skateboard may be slightly darker than the building for easy recognition. Do not download models, textures, motion libraries, or HDRs.
1. First read the image, then build the space
Identify the coordinate directions, dimensions, walls, two doorways, columns, obstacles, character route, surrounding area, and spatial height in the image, and save the results as scene_spec.json. The building dimensions and object positions are based on the image; do not lay the image on the ground instead of modeling.
Build three connected areas: the front yard, the enclosed factory building, and the open-air courtyard. The factory building has walls and a roof with real thickness, and the camera and character can only enter and exit through the specified doorways; the roof skylight can let light through, but walls, roof, or columns must not be temporarily hidden to let the camera pass through. The route arrows are the character's direction of travel, and the camera needs a separately planned safe path.
2. Character and skateboard
Create an articulated puppet about 1.75 meters tall with clearly recognizable head, torso, pelvis, upper and lower arms, upper and lower legs, and feet. The skateboard has a deck, trucks, and four wheels, with proportions matching the puppet. A simplified skeleton or parent-child hierarchy may be used; there is no need to create facial features or clothing.
Fully depict pushing forward by kicking the ground, both feet returning to the board, bending the knees to turn, pressing the board to build power, jumping and tucking the legs, clearing the obstacle, cushioning the landing, and resuming skating. When pushing, one foot supports on the board while the other foot actually approaches and touches the ground; after tucking the foot back, it returns to the board surface. When jumping, the skateboard rises with the feet, and after landing the wheels touch the ground. It is not acceptable to merely translate a puppet whose limbs do not move, nor to let feet pass through the board surface, wheels pass through the ground, or the character glide while suspended in the air.
3. The twelve-second action and camera
0-2 seconds: The skateboarder completes two pushes to accelerate in the front yard and enters door A along the route shown. The camera follows from behind and to the side of the rear wheels, about 0.25 meters above the ground, and can see the wheels, feet, and the doorway ahead.
2-4 seconds: The camera follows the skateboarder through door A and enters the factory building. The character follows the route in the image around the columns, turns into the central passage, leans the body, and adjusts balance with both arms; the camera rises smoothly to about 0.8 meters, always allowing the distance between the character and the columns to be judged.
4-5 seconds: The skateboarder approaches the low obstacle, bends the knees, and presses the board, preparing to jump. The camera moves to the rear side to leave space for the subsequent orbit.
5-8 seconds: The person and skateboard leap into the air over the obstacle, with one slow-motion display. The camera completes a continuous 360-degree orbit around the moving character, passing from the rear side through the side, front, other side, and back to the rear side; the orbit radius is about 3 meters, and the camera height rises smoothly from about 0.6 meters to 1.4 meters. Throughout, the relationship among the character, board, and obstacle must remain recognizable; the camera must not rotate in place instead of moving around the character.
8-10 seconds: Normal speed resumes, completing the four-wheel landing, knee-bent cushioning, and body straightening, then accelerating toward door B. The camera returns smoothly to the tracking position, and the transition must not suddenly turn around or jump position.
10-12 seconds: The character and camera pass through door B one after another and enter the courtyard. The camera confirms it has left the building before rising, and finally sees the skateboarder, the exit, and the factory building facade at the same time, showing that they have indeed passed through the same building.
Slow motion is a change in the finished runtime: the same segment of motion—the takeoff and obstacle clearance—is extended in the presentation, with the character, skateboard, and wheels all advancing through time at the same rate, while the camera still orbits as planned. Use a monotonically increasing motion-time mapping or an equivalent approach to control the pacing; both the slow-motion entry and exit must be smooth, and do not pad the duration by having the character hover in midair or by repeating frames.
IV. Spatial constraints and visual checks
First plan the traversable ranges for the character, board, and camera, then create the animation. Both the character and the camera must have clearance when passing through the doorway; when going around the pillar and orbiting, avoid the walls, columns, and roof, and when the character is airborne, they must actually clear the obstacle shown. Only expected contacts such as pushing off the ground, the feet on the board, and the wheels touching down may occur.
Use Blender MCP to query the scene, run code, and view keyframe screenshots. At minimum, check entry through door A, going around the pillar, the wind-up, the takeoff, the four directions of the orbit, the landing, passage through door B, and the ending. Check whether the camera passes through walls, whether the character is occluded by the pillar for a long time, whether the foot-to-board relationship is correct, whether the orbit completes a full circle, and whether the exit is still clearly visible at the end. After finding problems, fix them yourself, and finally play back from the beginning or check frame by frame the complete exported video.
V. Deliverables
– previs.blend: an editable project that preserves object naming, the character hierarchy, the action, and the camera keyframes.
– previs.mp4: the actually rendered 12-second white-model video, with no subtitles, timecode, or debug text obscuring it, compatible with ordinary players.
– build_scene.py: a complete script that can rebuild the scene and animation.
– scene_spec.json and camera_path.json: record the image-reading results, as well as the per-frame finished time, motion time, character position, camera position, orientation, and focal length, to facilitate checking space and speed.
– contact_sheet.png: at least 12 keyframes with time markers, used separately for acceptance, not burned into the video.
– check_report.md: record what was actually checked, the fixes made, and the items not completed.
Please complete the environment connection, image reading, modeling, action, camera movement, checking, and exporting yourself within the same task; I only need to be involved for the necessary environment operations above. When the rendering task is long, execute it in stages and query the completion status. If the connection or export fails, first diagnose and fix it yourself; only if you still cannot continue, explain the specific gap and keep the project and recovery records. If there is only a script or screenshots, you cannot claim that the video has been completed.
In the 12-second shot, the camera follows from the front yard into the factory building, goes through the obstacle clearance and a full orbit, and exits through another door; the character's action and spatial relationships now have a directly viewable reference. Compared with the trajectory file, the 360° orbit is indeed completed from 5 to 8 seconds, and the slow motion also has continuous time variation; as a shooting previsualization, it is already possible to check how the camera moves and where the action is placed.
Next we will use the white model to generate the video; I am usingseedance 2.5。
Prompt:
Please use the white-model previsualization video uploaded and specified this time as the reference for the action, spatial layout, camera route, and speed rhythm, and generate a 12-second, 16:9 realistic skateboard commercial short film in one continuous shot.
The protagonist is the same adult skateboarder, wearing a burgundy loose jacket, dark gray work pants, off-white skate shoes, and a black helmet; the skateboard has a light wood-colored deck and black wheels. The character's appearance, clothing, body proportions, and the skateboard's appearance remain consistent throughout the film, and no other protagonist is added.
The scene is an old industrial factory building converted into a skateboarding practice ground: the front yard is light gray concrete, while the interior retains concrete columns, exposed steel beams, and high lighting windows, with warm evening light pouring in through the atrium. Add wall wear, tire marks, a small amount of floating dust, and natural reflections. The details of the person and skateboard are clear; avoid using an overly dark image or thick smoke that obscures the action.
Strictly follow the relative positions and scale of the front yard, Door A, factory building, columns, low obstacles, Door B, and atrium in the reference, preserving the direction around the columns, the obstacle-crossing position, and the two door-passing processes. Newly added materials and details must not block the original passageways, and the architectural structure must remain consistent when the camera changes.
The actions and camera follow the chronological order of the reference video:
0–2 seconds: low-to-the-ground tracking shot of the feet and rear wheels, with two pushes to accelerate toward the entrance.
2–4 seconds: follow into the factory building, turn around a column, body leaning, arms maintaining balance.
4–5 seconds: approach the obstacle, bend the knees and press the board to gather power.
5–8 seconds: slow motion of the airborne obstacle crossing, while completing a continuous 360° orbit around the person along the reference route.
8–10 seconds: return to normal speed, all four wheels land, knees bend to absorb the impact, then accelerate toward the exit.
10–12 seconds: pass through the exit into the atrium, the camera rises outside the building, with the person, doorway, and factory exterior facade in the same frame.
Preserve the camera height, foreground-background occlusion relationships, orbit direction, and speed changes from the reference video. The action is continuous throughout, the movement of the person and skateboard is consistent, and the feet on the board and wheels on the ground are clearly visible. Do not cut the camera, teleport, change scenes, or use repeated frames or prolonged hovering in the air to replace slow motion; do not change the 360° orbit into the image itself rotating.
Maintain a realistic photographic texture, with warm sunset colors and slightly cool indoor shadows creating layers. High-speed sections have natural motion blur, and slow-motion sections clearly show the relative positions of the feet, board, and obstacle. The sound effects are mainly wheels, pushing off, landing, and indoor echoes, with no dialogue, subtitles, brand logos, or extra opening or ending credits.
Looking at the white model and the generated video together makes the effect very intuitive. The person enters from outdoors, goes around the columns, and then jumps over the obstacle, basically progressing along the arrangement in the white model. The most noteworthy part is the orbit in the middle: the camera circles once around the airborne person, and the clothing, skateboard, and action still connect, then continues out the door, and finally the camera rises for the ending. The route, actions, and camera arranged earlier in Blender all have corresponding matches in the final video.
Summary: after this round of testing, the upgrade directions mentioned at the beginning have indeed produced visible results.
The spatial relationships in the design drawings were used to set up the construction site, the road closure notice entered the robot scheduling, and the scanned document revisions and financial report footnotes also affected the final calculation.
Then to editable PPT, Excel with formulas, and white-model previews that can continue generating videos, Doubao can already apply multimodal understanding to an entire task.
02. Some Sharing
I think the most outstanding part of Doubao's upgrade this time is that it can connect looking at images, understanding requirements, and producing finished products.
When AI programming and Agents enter actual business, they often face a mix of drawings, spreadsheets, documents, and software operations. Teams need to organize these materials into clear requirements, and then produce results that can be demonstrated, modified, and delivered; there is a lot of repetitive work in between.
Friends who make videos can focus on the white-model group. First arrange in Blender how the person walks and how the camera orbits, generate the preview, and then hand it to Seedance to add the person, materials, and lighting, making the value of this approach very intuitive.
Friends who want to test it can pick something they're currently working on: for example, hand over an annotated PPT along with the source spreadsheet, clearly write out what needs to be changed and what content should be kept, and see how far the delivery can be completed.
Running through it with your own materials also makes it easier to judge what Doubao can help with and how much work you'll still need to do yourself in the end.
Original link:Seed 2.1 Pro upgrade hands-on test, 7 high-difficulty tasks, understanding where Doubao is focusing its effort this time